
how to make the best AI image and you can see an example

Ryuzaki.eu.org - This is a semi-realistic AI painting which is currently popular among the public.
From now on, we will teach you how to accurately create the above memes using your Web UI.
If you know how to make it, the rest is easy.
Must read before reading this article!! Informational articles contain only very useful extracts
https://arca.live/b/aiart/69309717?target=all&keyword=exif+%EB%B7%B0%EC%96%B4&p=1
WEBUI Installation (basic)
This article is primarily intended for those who have WEBUI installed. If you don't have it installed, please do so!
1. What you need: Download the model
1) Orange Mix: https://huggingface.co/WarriorMama777/OrangeMixs/tree/main/Models/AbyssOrangeMix2

Just download AbyssOrangeMix2_hard.safetensors. (Click the arrow next to capacity to download)
2) Basil Mix: https://huggingface.co/nuigurumi/basil_mix/tree/main

Just download basil_mix_fixed.safetensors.

Just click download vae-ft-mse-840000-ema-pruned.ckpt.
2. Enter the downloaded Orange Mix and Basil Mix into the path.
Package path: Put the model into models\Stable diffusion
Colab Path: Upload the model to the Google Drive folder SD/models/Stable Diffusion
3. Place the downloaded VAE in the path.
Overall package path: Enter VAE into \models\VAE
Colab Path: Upload the VAE to the Google Drive SD/models/VAE folder
Ready!
Random model
1. Go to Checkpoint Merge in the Web UI. (If there is no model, update the Web UI)


(*It's easier and better if you don't touch his name)
3. Press the Merge button and refresh the WebUI, and a new model will be created.
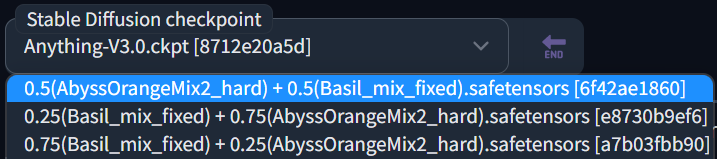
0.5 + 0.5 clicks
4. Apply VAE one more time, just in case.

Ready!
Arrangement
1. First, open the text tab 2 img

A blank screen greets you.
2. Set the same as below.


Copy and paste commands, the red part is a national rule command that improves quality. Change the rest to suit your taste.
RAW, 1girl, colorful, (skin detail:1.3), sharp focus, smooth, (beautiful beautiful and cute Korean woman:1.3), (makeup:0.6), instagram, (kpop idol, korean beauty, korean mix), ( brunette + bob cut: 1.3), big breasts, arms under breasts: 1.2, beaming smile 8k uhd, dslr, high quality, (movie grain: 1.3), (F1.4, 1/800s, ISO 100, photorealistic), skinny and thin, (white shirt, tight gray striped mini skirt, gray tie: 1.3), navel, in the library, toned, wide hips, thick thighs, wide legs, smooth stomach, pout, (uniform school)
4. Next, copy and paste this part.

Copy-paste command
(worst quality, low quality:1.4), (loli, child, baby, infant:1.3), (footwear:1.4), (pen:1.3), (pencil:1.4), (belt:1.5), (material burn:1.4 )
5. It will look like this when finished.

6. Adjust the batch quantity according to your wishes.

Batch count 5 = means drawing a total of 5 cards, 1 card at a time.
Batch size 5 = means draw 5 cards at once (I have the option to keep it sealed as I have a 3060)
And just turn it around.
Complete Mode

 saya adalah seni konten blog yang memberikan informasi seputar minat para orang-orang yang di seluruh dunia

0 Response to "how to make the best AI image and you can see an example"
Post a Comment